Process View
Maintenance > new world ERP Suite > Process Manager >
 Process
Using the default view of the Process Manager, you can add a department to a process. Once the department is associated with the process, the number of levels needed for approving items, such as invoices, purchase orders, etc., can be set up for the department. After the number of levels is defined, the next step is to define the users that are responsible for approvals at each level. You can also use this feature to give a user access to certain inquiry pages listed in Process Manager.
Setting up Departments
In most cases, approvals are defined at the department level for a particular process.
- Highlight the process to which you want to give a user access.
-
Click the Set Up Departments button. The Set Up Departments pop-up page displays.
 Show me

- The following processes include the Require Sequential Approvals check box, which, if selected, requires that approvals go through a central process (i.e., Level 2 cannot approve without Level 1's approval; Level 3 cannot approve without the approvals of Level 1 and Level 2):
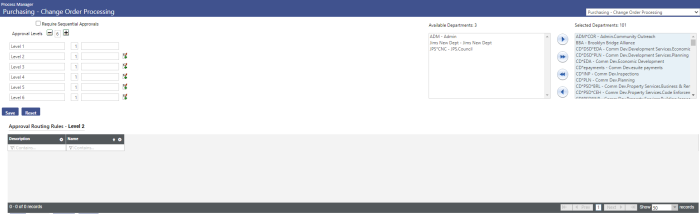
Purchasing - Change Order Processing
Purchasing - Entry
Purchasing - Requisition Entry
Purchasing - Voucher Change Entry
Purchasing - Voucher Entry
Purchasing - Voucher Requisition Entry
- Use the
 and
and  icons to adjust the number of approval levels to be used for this process. This will adjust accordingly the number of rows displayed below, as well as the approval requirements on the processing pages.
 - In the first text field under Approval Levels, enter the name of the level responsible for the first approval (Entry, Initial Approval, etc.). This text displays on the Approvals pages throughout the system when processing approvals for this department.
- In the second text field, enter the number of approvals required at this level for the department.
- If the departments are being set up for purchasing, there will be an additional text field next to the field where you entered the number of approvals. This field is for dollar-level approvals. If there is a maximum value that a user at this value can approve, enter that amount in this field.
Note: Dollar thresholds may not be used in combination with purchase order approval routing exceptions.
- Select the Available Departments that should be available for this process.
- Repeat Steps 4 through 7 for additional approval levels.
- Click Save.
Process Maintenance
The Process Maintenance button is available only when the user selects a purchase order process that includes monetary approval limits. When the user selects this option, the system launches the Approval Maintenance pop-up page. ![]() Show me
Show me
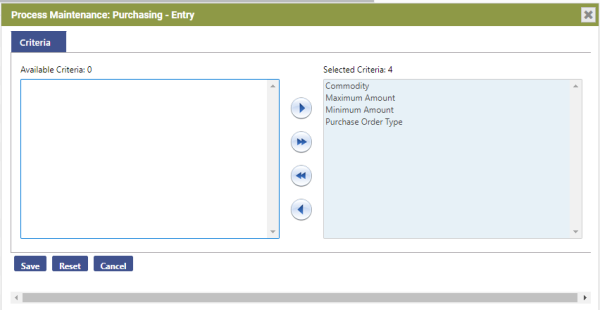
Select the criteria that should trigger an approval for this process and click Save. The criteria must be selected here for it to be available for selection when the user defines approval exception rules, discussed in the following section.
Adding Approval Exception Rules
In purchasing (Requisitions, Purchase Orders, Change Purchase Orders, and the corresponding vouchers for each), approvals can also be based on dollar levels. Organizations can also define routing exceptions to where dollar-based, purchase order type or commodity code approvals should be used. If certain conditions are met, the organization can bypass levels of approval and use just the levels mandated by their organization’s internal rules.
Note: Routing Exceptions may not be used in combination with dollar amount thresholds.
-
Click on the
 icon. The Approval Exception Rules section will display on the page. Show me
-
To add an exception, click the New button. This will launch the Process Manager Approval Routing Rule Entry page.
Show me
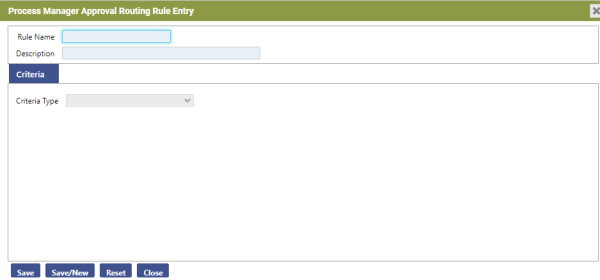
- Enter the Rule Name. This value is required; it may contain up to 32 characters.
- The Description is also required; it may contain up to 64 characters. Both the Rule Name and the Description will display in the exception grid, so the values should make the rule easily identifiable.
- Click Save to record the entry and enable the Criteria tab.
- Select the Criteria Type. This value is required. The drop-down field is loaded with the options that must have been previously defined for the process on the Process Manager Approval Maintenance page.
- Once the Criteria Type is selected, the field will display to select the available criteria for the rule. The field type and content will vary depending on the Criteria Type selected. If Commodity Type or Purchase Order Type is selected, the user will see a list box to allow available commodity levels or purchase order types to be selected. At least one must be selected.
- If a Criteria Type of Minimum Value or Maximum Value is chosen, the numeric Criteria Value field will display. This value is required.
- Click Save.
Editing Approvals
After approval levels have been associated with a department, approval levels can be added or removed at a later date, if desired.
Note: Approval levels may not be modified if the process has already been used for transactions. If modifications need to be made, the effective date will need to be copied first. Refer to the Changing an Approval Structure section below for instructions.
To add approval levels,
- Click on a department to highlight it.
- Click the Approvalsbutton to launch the Approvals pop-up page.
- Use the icon to add approval levels or the icon to remove approval levels.
- Click Save.
Adding Approval Users
Once the process has been selected and the necessary departments associated with that process chosen, then the users who are responsible for approving at a specific level can be selected.
- Click the icon next to the department for which you want to add approval users.
- Highlight the approval level that you defined on the Set Up Departments pop-up page and click the Approval Users button. The Approval Users pop-up page displays.
- In the Available Users field, click the desired user to highlight it. Ctrl + Click can be used to select multiple users, and Shift + Click can be used to select a range of users.
- Click the
 button to add the chosen users to the Selected Users field.
 - Click Save. The user is now available to approve items at the assigned level.
Changing An Approval Structure
After approval levels have been associated with a department and used, they cannot be modified. If changes to a used approval structure need to be made they must be copied to a new effective date.
When an effective date is copied, the system will also copy over any approval routing rules and exclusions defined under the process's previous effective date. It will also copy the approval routing rules and exclusions for departments that are still part of the effective-dated process being copied if they have the same approval structure.
- To copy a process's effective date, click the icon next to the process name to highlight it. The Copy Effective Date button will become active.
- Click the Copy Effective Date button. The Copy Effective Date pop-up page displays.
- Enter date in the New Effective Date field or click
 to choose a date from the calendar. It must be set to the next day or another date in the future.
Now that the effective date has been copied, changes to the approval structure can be made.
- Click on a department to highlight it.
- Click the Approvals button to launch the Approvals pop-up page.
- Use the icon to add approval levels or the icon to remove approval levels.
- In the fields enter the title of level and the number of approvals necessary at that level.
- Click Save.
An  will be displayed next to the department denoting its modification.